ID Verification Policy
Any time we receive an order, either direct or online, where the billing and shipping addresses DO NOT match, we must perform an ID Verification Process for the customer to ensure that we are fulfilling a valid order. We allow a total of 4 business days for the ID CHECK to be completed. If a customer has not responded to an ID check request, or is unwilling to submit to an ID for verification within 4 business days of notification or 2 business days from secondary follow up, we must cancel and refund the order to avoid chargebacks.
The options by which a customer can submit and ID Check Verification are as follows:
Option 1: Submit Photo ID
The customer may submit a picture of the credit card (both front and back) along with a picture of their photo ID. It is only necessary for us to see the last four digits of the card and the name on the card, and the name and signature on the ID. The customer can block all other information for security of their information.
Option 2: Pay via PayPal
If the customer prefers not to complete option #1, a quick and simple alternative would be to complete the purchase using PayPal. PayPal authorizes user information and identity as a function of their service. A refund of the original payment must be completed and a PayPal payment request must be sent to the customer.
ID Verification for web orders:
When a web order is placed, it is automatically imported into NS and placed in the Orders to Approve list. From this list, the “approver” can determine if the billing and shipping are a match by reviewing the address columns of the search results. If they encounter an order where the billing and shipping do not match, they will follow these steps:
- Locate the order on the backend of the matching web store.
- Open the order to review the details. If the customer has previous purchases in their web store history, the previous purchases may be reviewed to determine if we have fulfilled orders to the customer previously. If so, we can assume the customer has already completed the verification process on a previous order and the current NS order can be moved to “pending fulfillment” without an ID verification process. If the customer has no previous orders on file, move to step 3.
- Open the NS order in “edit” mode.
- Check the “ID CHECK NEEDED” box.
- Add memo: “ID Email Sent”
- Click Save.
- Click the “email” button on the saved order.
- On the “message” subtab, select the template: “ID Check Requested”
- Click “Merge and Send.”
With the ID CHECK NEEDED box checked, the order will be automatically moved to the GSI-Orders Awaiting ID Check list.
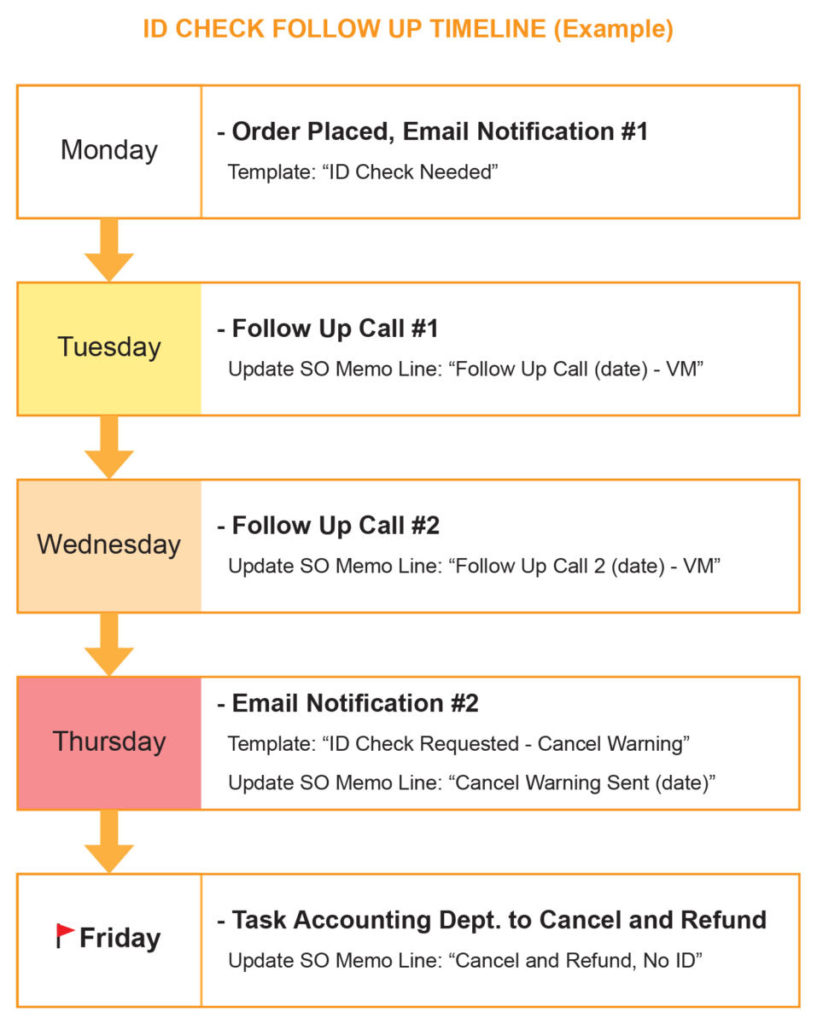
ID Verification Follow Up Policy
Follow Up Call #1:
If an order has been on the “GSI-Orders Awaiting ID Check” list for more than 24 hours, the order will be highlighted Yellow. This will prompt a follow up call from the Processing Dept.
- Open the order in “edit” mode.
- Call the customer to resolve the ID Verification.
- If not resolved, replace the memo line: “Follow Up Call (date) – VM.”
- Click Save.
Follow Up Call #2:
If we still have no resolution, and an order has been on the list for 48 hours or more, order will be highlighted Orange. This will prompt a final call from the Processing Dept.
- Open the order in “edit” mode.
- Call the customer to resolve the ID Verification.
- If not resolved, replace the memo line: “Follow Up Call #2 (date) – VM.”
- Click Save.
Email Notification #2:
If we still have no resolution, and an order has been on the list for 72 hours or more, order will be highlighted Red. This will prompt a second email from the Processing Dept.
- Open the order in “view” mode.
- Click the “email” button on the SO.
- On the “message” subtab, select the template: “ID Check Requested – Cancel Warning.”
- Click “Merge and Send.”
- Replace the memo line: “Cancel Warning Sent (date).”
- Click Save.
Task Accounting to Cancel And Refund:
If we still have no resolution, and an order has been on the list for 5 business days or more, the text on the list will turn Bold and have a Red Flag Icon next to it. this will prompt the cancellation process:
- Open the order in “edit” mode.
- Replace memo line: “Cancel and Refund, No ID.”
- Click Save.
- Create a new task for the SO.
- Enter Task Title: No ID Response, Cancel and Refund.
- Assign the task to Katie Tilley (accounting).
- Check the “Notify assignee by email” check box.
- Click Save.
Cancellation of SO in NS (Accounting ONLY)
- Open the SO in “edit” mode.
- Under the billing subtab, remove payment method.
- Click Save.
- Click “Create Deposit” button.
- Edit the date field on the Customer Deposit to match the original SO date.
- Add payment method. (i.e. E-Comm Credit Card)
- Click Save.
- Return to SO, Click the “Approve” button.
- Once SO has saved, click the “Close Order” button. This completes the cancellation of the order in Netsuite.
Refunding of payment to customer from Web Store (Shopify):
- Locate the order on the backend of the matching web store.
- Click “Refund.”
- Adjust inventory qty to be refunded.
- Enter shipping refund amount manually.
- Ensure total refund matches the total available for refund. Click Refund. This completes the refund of the payment to the customer.
Reconcile refund to customer in NS
- Go to: Transactions > Customers > Issue Customer Refund
- Enter customer name in customer field.
- In the account field, select: 14116 Other Current … : Undeposited Funds
- Go to subtab “Apply,” then to subtab “Deposits.”
- There you will find the customer deposit you created earlier in this process. Select that deposit.
- Move to subtab “Refund Method.”
- Select appropriate refund method (i.e. E-Comm Credit Card)
- Click Save. This completes the documentation in NetSuite reflecting the refund of payment from the web store.
Confirming a Photo ID Submission
If we do hear back from the customer with an email containing their ID, and Credit Card images:
- Open the SO in “edit” mode.
- Remove the “ID CHECK NEEDED” checkbox.
- Replace the memo line with: ID OK
- Set status to “pending fulfillment.
- Click Save.
- Click the “email” button on the saved order.
- On the “message” sub tab, select the template: ID Verification Complete, then click “merge and send.
ID Verification Through Paypal
If the customer responds to the ID verification request by stating they would prefer to use the PayPal process, follow these steps:
- Open the SO in “edit” mode.
- Replace the memo line with: PayPal Request Sent
- Click Save.
- Click the “email” button on the saved order.
- On the “message” sub tab, select the template: ID Check PayPal Process, then click “merge and send.”
- Create a new task on the SO.
- Enter Task Title: PayPal ID Verification
- Assign the task to Katie Tilley (accounting)
- Check the “Notify assignee by email” check box.
- Enter the following message in the task message field: Please refund original payment on (SO number), and please send PayPal request to (customer email) in the amount of (SO total) for ID verification.
- Click Save.